Why multi-camera video collection for robotics training is a systems problem
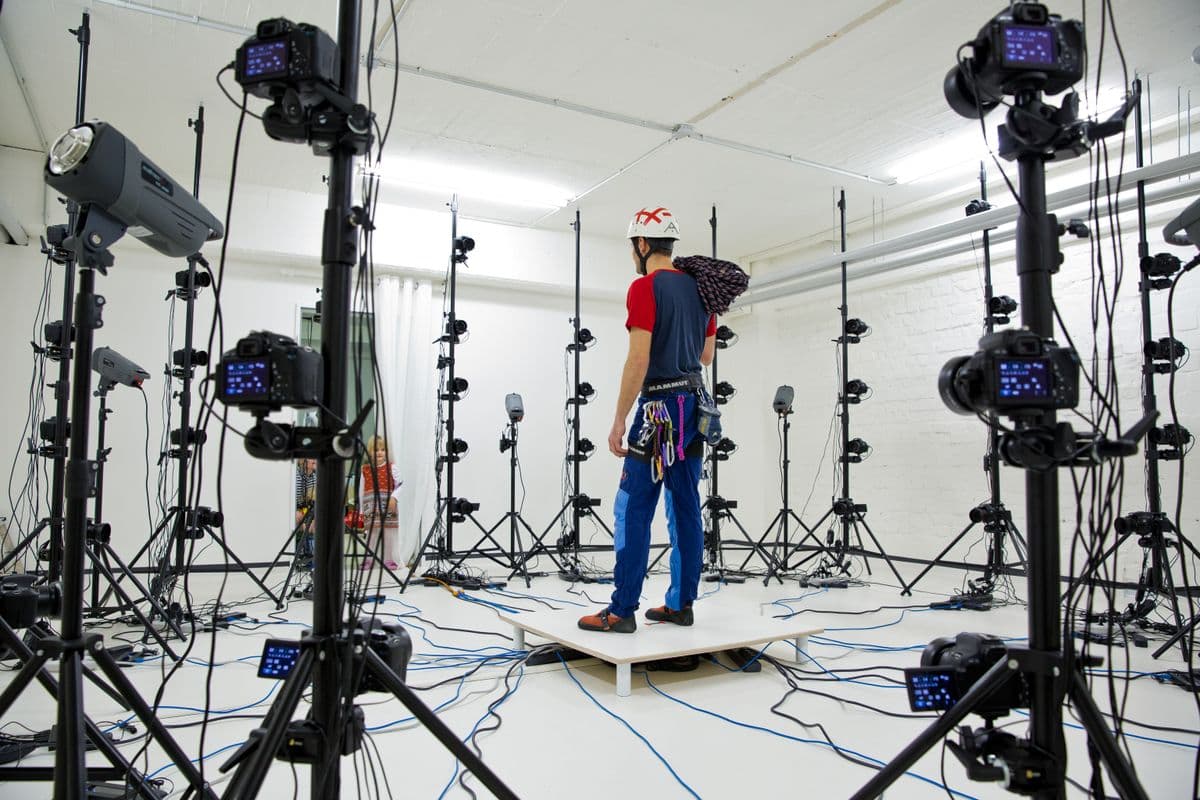
Multi-camera video collection for robotics training records the same task from several synchronized, calibrated viewpoints at once: typically a wrist camera, one or more fixed third-person cameras, and often an egocentric view from the demonstrator's head. Done well, it gives robot policies observations that survive occlusion and gives perception teams the geometry to recover 3D. The failure mode is several videos of one event that disagree about when and where things happened.
Camera count is rarely the hard part. Each added camera brings another clock, another set of exposure settings, another calibration that can drift and another 20-50 Mbit/s to move and store. At DataX Power, where we run multi-camera video collection for robotics training from Vietnam, we treat the whole array as one system with one clock and one calibration. The eight steps below walk through that design in order.
We wrote this guide for robotics and data leads specifying multi-camera robot data collection, whether the end use is imitation learning, VLA fine-tuning or 3D pose supervision.
Why multi-view robot training data outperforms a single camera
Three reasons keep coming up. Occlusion is the obvious one: during a grasp the hand or gripper covers the object in at least one view, and a second angle recovers it. Calibrated views also make 3D supervision possible, because two or more of them let you triangulate hand keypoints, object positions and end-effector paths that a single camera can only estimate. And policies trained on several angles are less brittle when a deployed camera sits a few centimetres from where it was in training.
Public datasets reflect this. DROID recorded 76,000 trajectories, about 350 hours, with two adjustable external ZED 2 stereo cameras and a wrist-mounted ZED Mini, all at 15 Hz in 1280x720. ALOHA uses four RGB cameras at 480x640: two stationary, two on the robot wrists. For human demonstrations, Ego-Exo4D paired Aria glasses with four to five stationary GoPros per scene, and HOT3D found that multi-view methods significantly outperform single-view ones for 3D hand and object tracking.
Step 1: Choose a camera layout that matches the policy
Start from what the deployed robot will see. Supervision views come on top of that, and the specification should list the two groups separately. A policy may train on only the wrist and one external view, while the other cameras exist to produce labels. That split decides which cameras need production-matched lenses and mounting, and which only need good geometry.
Three layouts cover most programs:
- Manipulation cell: one wrist camera per arm plus two to four external views, as in DROID and ALOHA. The wrist view carries grasp detail; external views carry scene context and triangulation. Mount wrist cameras where the production robot's cameras sit.
- Egocentric plus exocentric: a head-mounted camera or glasses on the demonstrator with three to six fixed cameras around the work area. This suits human demonstrations for hand pose, household tasks and humanoid pre-training, where the egocentric view approximates a robot head camera and the array supplies 3D ground truth.
- Room-scale or mobile arrays: wall or ceiling cameras covering a larger space for whole-body and mobile manipulation, sometimes with on-board and chase cameras for navigation. Coverage per camera drops, so camera count rises.
Step 2: Plan camera placement and coverage before buying mounts
Placement is where multi-view programs save or waste the most money. The target is that every point that matters (fingertips, contact points, the gripper) stays visible in at least two cameras through the whole task, and ideally three so one can be occluded. The rules that get you there:
- Angle between views: for triangulation, cameras separated by a wide angle, roughly 45-90 degrees around the workspace, give far better depth than cameras placed side by side.
- Framing: fill the frame with the workspace, not the room. Pixels spent on empty floor are wasted.
- Light and interference: avoid cameras facing windows, lamps or each other, and keep IR depth cameras out of each other's projection.
- Body paths: check that the demonstrator does not block a camera during typical left- and right-handed reaches.
- Rigidity: use rigid brackets or weighted stands, and mark positions so a bumped camera can be restored.
- Validation: record a coverage clip in the pilot and mark any span where a key point drops below two views. Moving a camera then costs an afternoon. Moving it after 500 hours costs the 500 hours.
Step 3: Pick a synchronization method and set a tolerance
Synchronized multi-camera recording has to solve two problems: exposing frames at the same moment, and stamping them on one clock. Some methods do both; some only the second. The accuracy figures below are typical ranges, and actual results depend on the cameras and network.
Multi-camera sync methods compared for robot data collection
| Sync method | Typical accuracy | Relative cost | When to use |
|---|---|---|---|
| Hardware trigger or genlock | Microsecond-level exposure alignment | Moderate: trigger-capable cameras, trigger box, cabling | Manipulation cells, contact-rich tasks, triangulation, fast motion |
| PTP (IEEE 1588) network cameras | Clocks typically aligned to microseconds; exposure alignment depends on camera support | Moderate to high: PTP-capable cameras and switches | Larger or distributed arrays, GigE camera studios |
| Timecode (SMPTE) | Frame-accurate stamping; exposure not aligned unless also genlocked | Low to moderate: timecode generators per camera | Cinema or prosumer cameras in ego-exo setups |
| Software timestamps on a shared host | Several ms to tens of ms, with jitter | Lowest | Slow tasks, perception-only data, early prototypes |
| Post-hoc visual or audio sync (LED, QR code, clap) | About one frame, finer with sub-frame methods | Very low | Consumer cameras, crowdsourced kits, and as a check on every other method |
- Baseline tolerance: an offset under half a frame period, about 16 ms at 30 fps and 8 ms at 60 fps.
- Tight tolerance: roughly a millisecond or better for triangulating fast hand motion or aligning video with force/torque contact events, which in practice means hardware trigger or PTP.
- Reference point: Ego-Exo4D's QR-code method localized time to under a millisecond, with manual checks that each GoPro sat within one frame of the Aria camera.
- Verification: record a visible sync event at the start and end of every session and measure the offset at both. A constant offset can be corrected; drift of unknown shape cannot.
Step 4: Match frame rate, exposure and white balance
Views that disagree on timing or colour are harder to fuse and easier for a model to tell apart. Run every camera at the same constant frame rate, or at integer multiples if one view needs high speed, and reject variable-frame-rate footage from phones or action cameras at ingest. Lock exposure, gain and white balance per session instead of letting each camera adapt on its own.
Mixed camera models complicate colour because their sensors and image processing differ. A colour reference chart captured at session start lets you correct differences later and documents the settings. Choose shutter speed for the fastest motion in the task, then add light until gain is acceptable. Mains power runs at 50 Hz in all four APAC markets where we recruit participants (Vietnam, Thailand, Singapore and Malaysia), so studio lighting should be flicker-free or exposures set in multiples of 10 ms to avoid banding.
Step 5: Calibrate intrinsics and extrinsics, then re-check on a cadence
Intrinsic calibration fixes each camera's focal length, principal point and lens distortion. Extrinsic calibration fixes where every camera sits relative to the others and to the robot. Between them, Kalibr (which handles camera systems whose fields of view do not all overlap) and OpenCV with ChArUco boards cover most needs. Wrist cameras also need hand-eye calibration to the robot flange.
Healthy calibrations typically show reprojection error under about 0.5 px RMS. The more useful signal is change between start and end checks: a camera that moved mid-session invalidates that session for triangulation even if every image looks fine. Version every calibration and link each episode to the one valid when it was recorded. A workable cadence:
- Intrinsics: once per camera unit at program start, and after any change of lens, focus, zoom or resolution.
- Fixed studio cameras: extrinsics at the start of every capture day, with a board check at the end.
- Tripods, mobile rigs and wrist cameras: extrinsics at every setup or session, since these move most.
- After any bump, mount change or failed check: immediately, before capture continues.
Step 6: Size ingest bandwidth and storage
Multi-camera rigs hit bandwidth limits before disk limits. One uncompressed 1080p stream at 30 fps is roughly 750 Mbit/s, so five of them exceed a 1 Gbit link and can saturate a single USB 3.0 controller. Production rigs encode at the camera or capture host and spread cameras across controllers or network ports. Everything writes to local SSDs first.
Storage math is simple and worth doing early. Take a five-camera rig (one wrist, three external, one egocentric), each streaming 1080p30 at about 25 Mbit/s after H.265 encoding. That is 125 Mbit/s, roughly 56 GB per hour. A 1,000-hour program produces about 56 TB of video, and closer to 120 TB once a backup copy and derived files are counted. Depth streams or higher bitrates push those numbers up quickly.
Plan the transfer path too. Capture SSDs get copied to network storage every night with a checksum at every hop, and automated QA runs within a day so a failing camera is caught before the next session.
Step 7: Fix file naming and episode structure
Multi-view datasets fall apart at the file level more often than at the camera level. Fix the naming scheme and episode structure before the pilot and never rename cameras mid-program.
- Stable camera IDs that describe the role, such as wrist_left, wrist_right, ext_front, ext_side and ego, used identically in file names, metadata and training keys
- A predictable pattern, for example program_site_session_episode_camera, so any file traces back to its session and calibration
- One episode per task attempt, with start and end timestamps on the shared clock, and failed attempts kept and flagged rather than deleted
- Session metadata: participant ID, scene, lighting, camera settings, calibration version and measured sync offsets
- A manifest with a checksum for every file
Step 8: Deliver in multi-view formats your training stack reads
The three formats robotics teams ask for most all handle multiple cameras, in different ways. LeRobot's v3 dataset format stores state and action data in Parquet and camera frames as MP4 sharded per camera, with metadata mapping episodes into those files; each view appears as its own observation.images key. RLDS stores episodes as sequences of steps, and each step's observation can hold one image entry per camera. MCAP is an open container for timestamped multi-channel logs and the default log format in ROS 2, so each camera gets its own channel, as do its calibration and every other sensor stream.
Many programs take two deliveries. One is raw MCAP or ROS 2 bags for reprocessing; the other is a training-ready copy in LeRobot, RLDS or HDF5, with episodes segmented and calibration attached. Validate both on pilot data in the client's own training code before production starts.
On our side, DataX Power runs third-person arrays with synchronized timestamps for multi-angle 3D pose, wrist-mounted and overhead manipulation views (synchronized with force/torque logging where needed), egocentric rigs, and on-board plus chase-camera navigation capture. We handle hardware, participants, consent, QA and delivery ourselves. A pilot specification typically comes back within five business days, and onboarding takes about two weeks.
We run managed multi-camera video collection for robotics training from Vietnam. Rigs include synchronized third-person arrays, wrist and overhead manipulation views and egocentric setups, with delivery in LeRobot, RLDS, MCAP or your own format.
See our managed data collection serviceFrequently asked questions about multi-camera robot data collection
These come up in most scoping calls for multi-view robot training data.
- How many cameras does a robot training data rig need?
- Most manipulation programs use three to five: a wrist camera per arm plus two or three external views, similar to DROID's two external cameras and one wrist camera or ALOHA's four cameras. Human demonstration programs that need 3D hand pose often add a head-mounted camera and four to six fixed cameras. Size the array so every key point stays visible in at least two views throughout the task.
- What sync accuracy does multi-camera robot training data need?
- A common minimum is an offset under half a frame period, about 16 ms at 30 fps. Triangulating fast hand motion or aligning video with force/torque contact events needs roughly a millisecond or better, which usually means a hardware trigger or PTP-capable cameras. Whatever the method, a visible sync event at the start and end of each session lets QA measure the real offset.
- How often should a multi-camera rig be recalibrated?
- Calibrate intrinsics once per camera and after any lens, focus or resolution change. Fixed studio rigs need an extrinsic check at the start and end of each capture day. Anything that moves (tripods, mobile rigs, wrist cameras) needs one at every setup, and any rig needs one immediately after a bump. Link each episode to the calibration version that was valid when it was recorded.
- What format should multi-view robot training data be delivered in?
- Match the training stack. LeRobot format keeps per-camera MP4 video next to Parquet state and action data. RLDS stores episodes of steps with one image entry per camera. MCAP holds timestamped multi-channel logs and is the ROS 2 default. Many teams take raw MCAP for reprocessing plus a segmented training copy, both validated on pilot data.
- How much does multi-camera video collection for robotics training cost?
- Our practical estimate, consistent with DataX Power's published ranges, is that synchronized multi-camera and multi-sensor programs typically fall around $200-$450 per captured hour, against roughly $80-$200 for egocentric-only capture. Camera count, sync hardware, calibration cadence, participant requirements and QA depth move the figure within that range. Annotation is priced separately.
- Why choose DataX Power in Vietnam for a multi-camera robotics program?
- We have run multi-camera video collection and stereo egocentric collection for robotics training, backed by two years of hands-on AI and robotics data work and more than 100,000 collection hours executed. Collection runs from Hanoi and can be onsite, in a studio or crowdsourced. We also have a presence in Melbourne and participant networks in Vietnam, Thailand, Singapore and Malaysia. Our QA engineers are trained on robotics video, and because we also build custom AI models, we design capture around how the data will train. Programs scale from 100-hour pilots to 50,000 hours on one contract.